In order to make our film opening look as realistic as possible, we used the idea of a 'vlog' throughout the film. This was achieved through both the use of a Final Cut Pro filter and also Photoshop. This was one of many programs that we used for our film opening, these posts can be found here
Firstly, we used a template of a youtube screen, which we then edited in order to make it look realistic. Below is an image of the original screenshot:
The eraser tool helped us to eliminate any unnecessary text and make it our own
We added a new title, changed the account name to suit our character and also added a new profile picture
After editing a series of youtube templates, we then inserted the image onto final cut
We placed the image below our footage, this allowed us to resize the footage and place it into the empty 'youtube' screen.
This worked well as it creates the image of our character actually being a youtube star.
This process was also repeated for the fast cut boyfriend scenes which illustrates that the killer is filming the Bf's death
We decided to use a series of clips which included the youtube overlay because it shows her youtube journey up until the day of her 'death'
In order to create a series of glitches, effects and our title sequence, we decided to use both Adobe After Effects and Premier pro. These two programs were vital, (along with Final Cut Pro) in our process of creating a film opening.
The inspiration and help
If you refer back to our editing programs post, we decided to revert to Youtube tutorials and professional websites which guided us to create our own effects.
This particular tutorial was vital in helping us to produce our killer glitches:
One reason why we used this particular video was because it had thousands of views with positive comments - this encouraged us to use this video as help and inspiration as it was simple to follow
Timing is a big factor and many videos and tutorials that we found lasted around 45 mins or more. This is why we chose this video as it only lasted 17 mins which meant that it was simplified for the audience.
In addition, the use of visual aids such as Youtube videos were extremely useful as you are able to pause and complete the step. You can also actually see what you need to press etc - this is better than step by step written instructions because they can be misinterpreted.
The killer's montage/glitches
The killer's glitches were edited and created on After Effects and took around 1 hour to perfect and complete.
Firstly, we cut the clips that needed glitches and imported them onto the program, where we started off adding a range of default After effects filters. These defaults included both 'distort' 'smear' and 'griddler'.
These default effects had to be adapted to the actual video and had to be synchronous too
The horizontal lines effect was the effect 'griddler' and in order to make them extremely small, we had to change the width and height of the lines. This can be found in the left hand bottom corner, where there are a variety of tools
Under this, we were also able to change the colour of the video and create a Red, Blue & Green colour effect
Along with this, you are able to see a moving glitch that runs up and down the killer's face
To do this, we had to create a new composition and add the 'smear' effect' In order for the effect to move up and down, we had to drag the small transform dots.
After dragging these dots to the top of the page ( outside of video) we had to create a keyframe for the 'smear' effect. These key frames set the precise times in which the effect moves up and down.
The black & white typing screen
For the glitch that pops up from time to time on our film opening, we also used After effects, but this time we imported a picture from google.
This picture was found under the 'Verbose mode' title and after watching a series of movies for inspiration, the 'verbose' effect created an idea that the person was 'hacking' into the device of the character.
In order to create a typing effect, we watched this particular video to get some help:
For the green glitch, we used the default 'griddler' effect once again, but adjusted the width of each line that appeared and also managed to change the colour of the glitch.
Green was the colour we decided on because we knew that it would be eye catching and allows the audience to ask questions on what just 'popped' up.
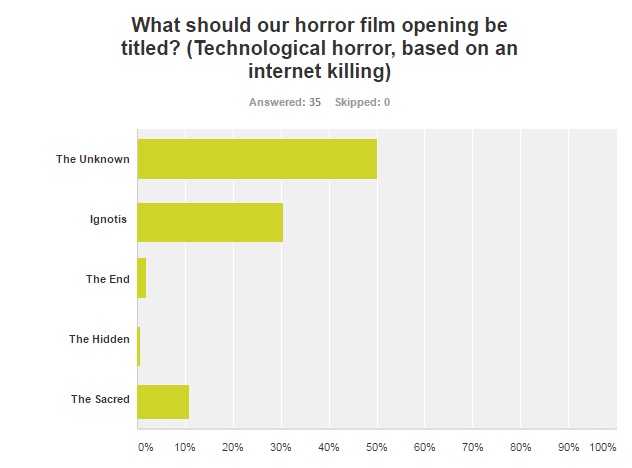
After doing intense research on what our film opening title would be, we conducted another quick survey on the website "Survey Monkey".
This was a great source as it helped us create a quick, easy and simple survey in which many people could answer. We chose this particular website as it allowed us to distribute the question extremely fast and the analytical feature allowed us to track the results when ever we received a new response.
Here are is the result:
From this, it is evident that the most popular title that fitted best with our film opening was "The Unknown". This piece of research helped us to then create a film title opening on Adobe After Effects. The result turned out like this:
The actual film opening will heavily rely on editing, for example we plan to edit and create our own 'glitch' and distortion effects. From research, we found that there are a number of programs that can help create this look, for instance:
Adobe After Effects
Final Cut Pro
Adobe Premier Pro
We found that these programs have a variety of effects that we think would be suitable for the opening.
Adobe After Effects - costs money
This particular program can only be used with a payment method however, we were able to access it as I had the program at home.
There are a variety of free effects including glitches, colour changes, distortion and static.
Final Cut Pro - available at school
Compared to the Adobe After Effects, although it is free as we can use it from the school Macs, we found that there are less effects that are useful to us for our project.
Adobe Premier Pro - costs money
Similar to the After Effects program, it costs money but we do have access to it, this particular software also has a range of effects and both the Adobe after effects and premier pro are able to combine together.
As both programs can work together, this is easy to create our glitches and effects.
Learning the editing skills:
From watching numerous YouTube tutorials it is clear that creating our own effects and glitches is not easy. These effects are extremely intricate and time consuming, therefore we have decided to try and get a few starter packs, these were free and available on rampantdesigntools.com. This company offers free effects packs that can be used for any type of project, they also have step by step tutorials which will help us to create our own.